BricsCAD®'s clearest programming possibility is the script. In this post, you will learn how to write scripts, and how to use BricsCAD's built-in script recording feature.
What are Scripts?
Scripts mimic what you type at the keyboard. Anything you type at the ':' command prompt can be put in a script file. That includes BricsCAD commands, their options, your responses, and --- significantly--- LISP code.
Mouse actions, however, cannot be included in script files, such as selecting dialog box and toolbar buttons. Scripts are strictly keyboard-oriented.
The purpose of scripts is to reduce the number of keystrokes you type. By placing the keystrokes and coordinate picks in a file, the file reruns your previously-entered commands. (Think of scripts as a predecessor to macros.)
A script file that draws a line and a circle might look like this:
line 1,1 2,2
circle 2,2 1
In this script, the Line command starts and then is given two sets of x,y coordinates, (1,1) and (2,2). The Circle command starts and is given a center point (2,2) and a radius (1). Hidden is the extra space at the end of each line, which is like pressing the Spacebar to end a command. In this post, I show hidden spaces with this character: ▄ .
Scripts are stored in files that have the .scr extension. Script files consist of plain ASCII text format. For this reason, do not use a word processor, such as Libre Office. Instead, to write scripts use a text editor, such as Notepad in Windows, Text Edit in Linux, or TextEdit in Mac.
You can use the BricsCAD script creation command RecScript (short for "record script") to record your scripts. Or you can enter the command text directly into a .scr file: when I feel like a DOS power user, I'll write the script in the Windows command prompt (press Windows+R, and then enter the Cmd command):
C:> copy con
filename.scr ; This is the script file
line▄1,1▄2,2▄
circle▄2,2▄1▄
When I'm done, I press Ctrl+Z to tell the operating system that I've finished editing and to close the file.
DRAWBACKS TO SCRIPTS
A limitation to scripts is that just one script file can be loaded into BricsCAD at a time. A script file can, however, call another script file. Or, you can use some other customization facility to load additional script files, such as with toolboxes, menu macros, and LISP routines.
Another limitation is that scripts stall when they encounter invalid command syntax. I sometimes have to go through the code-debug cycle a few times to get the script correct.
It is useful to have a BricsCAD reference text on hand that lists all command names and their options.
Strictly Command line Oriented
Another limitation is significant in this age of GUIs (graphical user interfaces): scripts cannot control mouse movements nor actions in dialog boxes. This is a reason that nearly all commands that display dialog boxes also have a Command line equivalent. But different commands handle this differently:
- Some commands have different names. For example, to control layers, there is the Layer for the dialog box and -Layer for the command line. If the script needs to create or change a layer, use the --Layer command, or better yet the CLayer system variable, as follows:
; Change layer:
clayer▄layername▄
- Some commands need system variable FileDia turned off. This forces commands that display the Open File and Save File dialog boxes --- such as Open, Script, and VSlide --- to prompt for filenames at the Command line. Thus, script files should include the following lines to turn off file dialog boxes:
; Turn off dialog boxes:
filedia▄0▄
; Load slide file:
slide▄filename▄
- When FileDia is turned off, use the ~ (tilde) as a filename prefix to force the display of the dialog box. For example:
: script
Script to run: ~ (BricsCAD displays Run Script dialog box.)
- Some commands have no Command line equivalent, such as the Plot Instead, when this command is used in a script, the Command line version appears automatically.
- While BricsCAD accepts command aliases with -- (hyphen) prefixes to force the Command line version of commands, it lacks the hyphen-commands found in AutoCAD®.
Recording with RecScript
The RecScript command records keystrokes and then saves them to a .scr script file.
The StopScript command tells BricsCAD to stop recording.
The Script command plays back the script.
Let's see how this works. Record a script for drawing a rectangular border sized 24×26 units:
In a new drawing, start the RecScript command. (Alternatively, from the Tools menu select Record Script.)
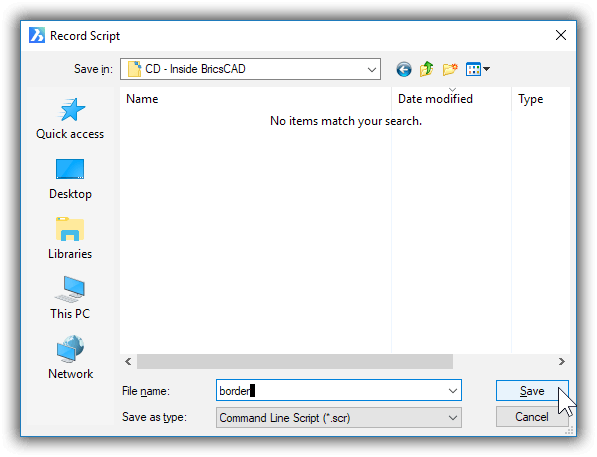
Notice the Record Script dialog box.
Starting to record a script by giving it a file nameEnter a file name for the script. It can be any name that will remind you of the script's function and can be up to 255 characters long. For this tutorial, enter border and then click Save.
Notice that the dialog box goes away and that BricsCAD appears to be doing nothing. In fact, it is waiting for you to enter commands. Enter the commands and options shown in boldface:
: rectangle
Chamfer/Elevation/Fillet/Rotated/Square/Thickness/Width/Area/Dimensions/ < select first corner of rectangle > : 0,0
Other corner of rectangle: 36,24: zoom
Zoom: In/Out/All/Center/Dynamic/Extents/Left/Previous/Right/Scale/Window/<Scale (nX/nXP)>: eWhen done, enter the StopScript command to signal BricsCAD that you are done:
: stopscript
Now run the script with the Script command, as follows:
- Start a new drawing with the New command, so that you can see the effect of the script.
- Enter the Script command.
- Notice the Run Script dialog box. Choose border.scr, and then click Open.
Notice that the script instantly draws the rectangle and then zooms the drawing to the extents of the newly drawn border. Indeed, it may occur so fast that you don't notice it!
TIP You can use the mouse to pick points in the drawing during commands that are being recorded by the RecScript command. BricsCAD records the pick points as x,y coordinates.
Writing Scripts by Hand
While BricsCAD has commands for creating and running scripts, it has no command for editing them. If you want to change the coordinates used by the Rectang command, you have to edit the script file with Notepad in Windows, Text Edit in Linux, or TextEdit in Mac.
Here's how it works:
- Open the border.scr file in the text editor.
TIP If you are not sure where the border.scr file is located on your computer, here is a quick way to find and open it in Windows: start the Script command and then in the dialog box, right-click the .src file. From the shortcut menu, select Open. Notice that the file opens in Notepad.
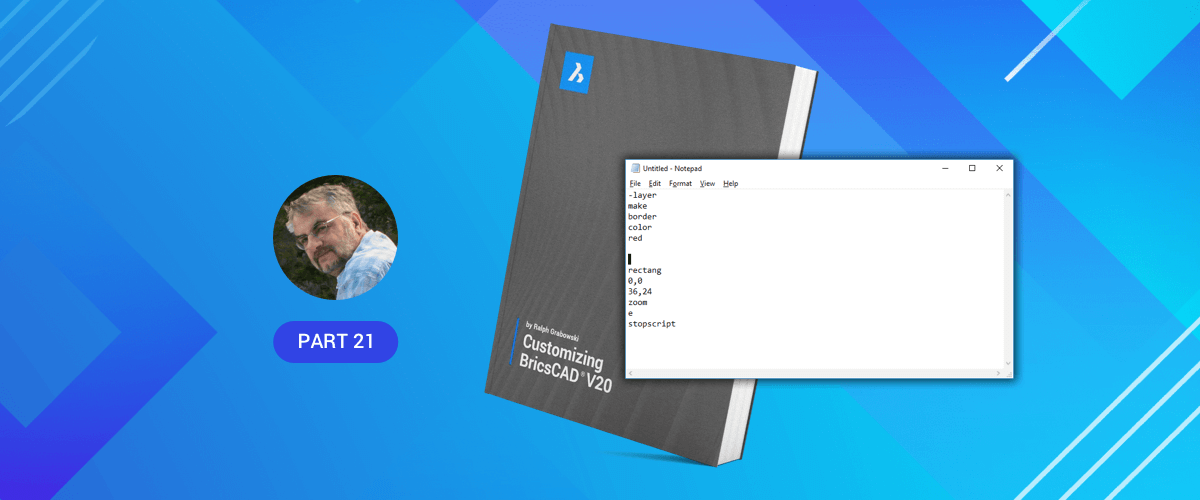
Notice the commands and options that you entered during the script recording session:

Entering a script in a text editor
Let's change the size of the border to 18×24. Edit the "36,24" text, replacing it with.
18,24
Let's also add the command for placing the rectangle on a layer named "Border" and colored blue:
Place the cursor in front of "rectang," and then press Enter to make an empty line.
Enter the following text:
-layer
make
border
color
red
▄ <-- One blank line
▄ <-- A second blank lineMake sure you include two blank lines; these act like pressing Enter during commands. The file should look like this now:

Adding Enters to the script
Save the file with the File | Save command.
Return to BricsCAD and then start a new drawing.
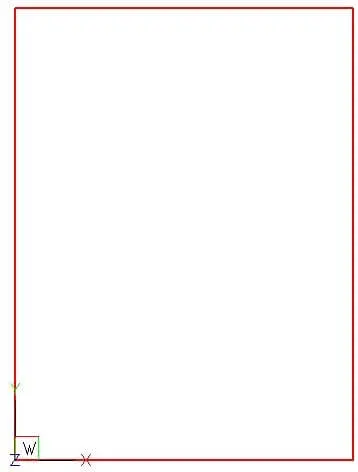
Use the Script command to test that the border.scr file is operating correctly. You should see a red rectangle.

Border drawn by the script.
Script Commands and Modifiers
There are a grand total of four commands that relate specifically to scripts. In fact, these commands are of absolutely no use for any other purpose. In addition, BricsCAD has the RecScript command for recording scripts, as described earlier in this chapter.
In rough order of importance, the four basic commands are:
SCRIPT
The Script command performs double-duty: (1) it loads a script file; and (2) immediately begins running it. Use it like this:
: script
Script to run: filename
Remember to turn off (set to 0) the FileDia system variable so that the prompts appear at the command line, instead of the dialog box.
RSCRIPT
Short for "repeat script," this command reruns whatever script is currently loaded in BricsCAD. A great way to create infinite loops. There are no options:
: rscript
RESUME
This command resumes a paused script file. Pause a script file by pressing the Backspace key. Again, no options:
: resume
DELAY
To create a pause in a script file without human intervention, use the Delay command along with a number. The number specifies the pause in milliseconds, where 1,000 milliseconds equal one second. The minimum delay is 1 millisecond; the maximum is 32767 milliseconds, which is just under 33 seconds.
While you could use Delay at the ':' prompt, that makes little sense; instead, Delay is used in a script file to wait while a slide file is displayed or to slow down the script file enough for humans to watch the process, like this:
; Pause script for ten seconds:
delay 10000
SPECIAL CHARACTERS
In addition to the script-specific commands, there are some special characters and keys.
Enter -- (space)
The most important special characters are invisible: both the space and the carriage return (or end-of-line) are the equivalent to when you press the spacebar or Enter keys. In fact, both are interchangeable. But the tricky part is that they are invisible. Sometimes, I'll write a script that requires a bunch of blank space because the command requires that I press the enter key several times in a row. AttEdit is an excellent example:
; Edit the attributes one at a time:
attedit 1,2
How many spaces are there between attedit and the coordinates 1,2? I'll wait while you count them...
For this reason, it is better to place one script item per line, like this:
; Edit the attributes one at a time:
attedit
1,2
Now it's easier to count the four spaces, since there is one per blank line.
Comment -- ;
You probably have already noticed that the semicolon lets you insert comments in a script file.
BricsCAD ignores anything following the semicolon.
Transparent -- '
Scripts can be run transparently during a command. Simply prefix the Script command with an apostrophe to run a script while another command is active, like this:
: line
Start of line: 'script
Script to run: filename
All four of BricsCAD's script-specific commands are transparent, even Delay. That lets you create a delay during the operation of a command --- as if I needed an excuse to run BricsCAD slowly!
Pause -- Backspace
...is the key I mentioned earlier for pausing a script file.
Stop -- esc
...stops a script file dead in its tracks; use the RScript command to start it up again from the beginning.
Download BricsCAD free for 30-days
Start Using BricsCAD Today
Permanent or subscription licenses that work in all languages, in all regions.
- Introduction
- 55 Tips for BricsCAD Users
- Settings
- Changing the Environment
- Custom User Interface
- Introduction to the Customize Dialog Box
- Customize the Menu Bar & Context Menus
- Toolbars and Button Icons
- Writing Macros and Diesel Code
- Ribbon Tabs and Panels
- Keystroke Shortcuts, Aliases & Shell Commands
- Mouse, Double-click & Tablet Buttons
- Absolutely Everything You Need to Know About The Quad
- Rollover Properties
- Workspaces and the User Interface
- Designing Tool & Structure Panels
- Creating Simple & Complex Linetypes
- Patterning Hatches
- Decoding Shapes & Fonts
- Coding with Field Text
- Writing Scripts
- Programming with LISP (Introduction)
- LISP Functions


