Mouse, Double-click & Tablet Buttons in BricsCAD
In this post, I will explain how to customize mouse, double-click & tablet buttons in BricsCAD®.
The mouse is your constant companion in BricsCAD, and you can customize its buttons, as well as those on a stylus or puck used with digitizing tablets. BricsCAD does not, however, explicitly support touch screens and styli used with Windows® 8.x and 10. BricsCAD supports 3D mice, but its buttons are customized by the utility software provided with them.
The Customize dialog box in BricsCAD is where you go to change the meanings of up to two buttons on mice and up to 15 buttons on tablet input devices:
Mouse tab --- assigns macros to the right and middle buttons, along with Shift, Ctrl (Cmd on Macs), and Shift+Ctrl keys; these are called "clicks." You can also assign macros to double-click actions.
Tablet tab --- assigns macros to buttons, along with the Shift key.
The following topics are covered in this post:
- Understanding how commands are assigned to mouse and tablet buttons and double-click actions
- Assigning commands, macros, and shortcut menus to mouse buttons
- Assigning actions to double-click actions and tablet buttons
SUMMARY OF MOUSE COMMANDS & VARIABLES
These are the system variables that affect the use of mice with BricsCAD:
| Variable | Meaning | |
|---|---|---|
| CtrlMouse | Toggles specific key-button combinations; when on, the following work: | |
| Ctrl+Left button | 3D view rotation | |
| Ctrl+Rigth button | 3D viewing with fixed z axes | |
| Ctrl+Shift+Left button | Real-time zooming | |
| Ctrl+Shift+Right button | Real-time panning | |
| Ctrl3DMouse | Toggles the use of 3D mice with BricsCAD (must restart the program after changing it): | |
| MButtonPan | Specifies the function of the middle button: | |
| 0 | (Off) Carries out the action defined by the Customize command | |
| 1 | (On) Pans drawing while dragging with middle button held down; default | |
| ShortcutMenu | Specifies the function of the middle button: | |
| 1 | Enable default mode shortcut menus | |
| 2 | (Default) Display shortcut menu for editing | |
| 4 | Display shortcut menu for commands during any command | |
| 8 | Display shortcut menu for commands when command options are active | |
| 16 | (Default) Display the shortcut menu when the right button is held down longer than usual | |
| ShortcutMenuDuration | Specifies how long to hold down the right button until a shortcut menu appears: | |
| 250 | (Default) Time in milliseconds, or 1/4 second | |
| ZoomFactor | Sets the zoom speed: | |
| 3 | Slowest speed, helpful for very slow zooming | |
| 60 | Default speed | |
| 100 | Fastest speed, useful for very large drawings | |
| ZoomWheel | Determines the scroll wheel’s zoom direction: | |
| 0 | (Off) Moving wheel forward zooms in; default | |
| 1 | (On) Moving wheel forward zooms out; Mac-like zoom |
The following command works with tablets:
Tablet --- toggles use of the tablet and configures tablet surfaces.
About Mice and Their Buttons
The very first computer mouse had 1 button. Since then, the button count on mice has strayed in different directions. Some mice have many more than three buttons, while others sport no buttons at all.

The first mouse (prototype)
For instance, I use the Logitech MX mouse (others are avlaible) with my primary work computer. It has nine buttons (I think) that offer functions like moving forward-reverse through Web pages and side-to-side scrolling. Other mice, such as one model from Apple, have no buttons at all: you tap, slide, pinch, and otherwise move your fingers on the smooth surface, as if it were a touchpad.
Mouse Buttons. Whether the mouse has three, nine or zero buttons, BricsCAD customizes only two of them --- the ones traditionally named "middle" and "right."
The left mouse button is never customized as it performs the all-important picking function.

BricsCAD's 1-3-2 numbering of left, right, and center buttons on mice
Modifier Keystrokes. You can define more than two actions for each button by adding Shift or Ctrl (on Macs, the Cmd button), and Shift+Ctrl keys to buttons.
So, when you hold down the Shift key while clicking the right button, BricsCAD executes a different command from when you click the right button alone.
Double-clicking. The other way to access more commands through the mouse is with double-clicking. When you double-click an entity in the drawing, BricsCAD runs a command suitable to editing the entity.
QUICK SUMMARY OF DEFAULT BUTTONS
Sometimes you might see buttons referred to by number. Here is what the numbers mean:
| Button | Number |
|---|---|
| Left | 1 |
| Right | 2 |
| Middle | 3 |
DEFAULT ACTIONS
BricsCAD assigns these macros to the right and center mouse buttons through the Mouse tab of the Customize dialog box:
| Keystroke+Button | Action | Macro |
|---|---|---|
| Right button | Repeats last command | unassigned |
| Middle button | Display object snap shortcut menu | $p0=SNAP $p0=* |
| Shift+ | ||
| Right button | Displays Entity Snap shortcut menu | unassigned |
| Middle button | Real-time rotation | unassigned |
| Right button | Real-time rotation about the z-axis | unassigned |
| Middle button | Displays object snap shortcut menu | unassigned |
| Right button | Real-time pan | unassigned |
| Middle button | Real-time rotation | unassigned |
WALKTHROUGH BUTTONS
Walkthrough navigation in perspective views uses the following mouse buttons and keystrokes:
| Mouse Button | Command | Meaning |
|---|---|---|
| Alt + Left button | RtWalk | Walks forward, backwards, and sideways |
| Alt + Middle button | RtUpDown | Moves up, down and sideways |
| Ctrl + Middle button | RtLook | Looks around |
| Ctrl + Home key | – | Resets view direction to the horizontal |
| Alt + Home key | – | Moves target point to the center of the scene |
| Alt + Plus key | RtWalkSpeedFactor | Increases walking speed |
| Alt+Minus key | RtWalkSpeedFactor | Decreases walking speed |
| Ctrl + Plus key | RtRotationSpeedFactor | Increases rotation speed |
| Ctrl+Minus key | RtRotationSpeedFactorDecreases | rotation speed |
TABLET BUTTONS
BricsCAD assigns no macros to stylus or puck buttons, by default. This can be done through the Tablet tab of the Customize dialog box.
Most double-click actions bring up the Properties panel, if it isn't already visible. The remainder are assigned to entity-specific commands, such as HatchEdit for hatch patterns or double-clicking a dimension starts the DdEdit command for editing its text. You can customize double-click actions.
Delayed Press. There is one more mouse action available for invoking commands. When you hold down the right mouse button longer than 250 milliseconds, then BricsCAD can carry out a different command. The command, however, cannot be customized by you.
The Customize dialog box's Mouse tab lists the possibilities, as shown below. The only button already assigned is Click (left button); it displays the Snap Menu. The other buttons are unassigned.

Customize dialog box's Mouse tab showing button definitions
Here is how to read the content of the Mouse tab: under Click, there are two entries: the first (-----) is for button #2, and the second (Snap Menu) is for button #3.
The remaining entries are for keyboard modifiers to buttons --- Shift, Ctrl, and Shift+Ctrl --- such as Shift-Click. At the end is the section for double-click actions
About the Pick Button
You cannot customize the pick button (left button) for good reason. You never want to lose the ability to pick things in the user interface or the drawing! BricsCAD doesn't let you customize the pick button in combination with keystrokes, either.
About the Right Button
The right button almost always has two specific functions:
In the drawing area --- ends the current command or restarts the last command
In most user interface elements --- accesses shortcut menus, just like in other programs
About the Middle Button
The middle button is often used as a quick way to pan and zoom around the drawing:
Panning --- hold down the middle button and then drag the mouse to pan
Zooming --- roll the scroll wheel back and forth to zoom in and out at the cursor
Orbiting --- hold down the Shift key, hold down the middle button, then drag the mouse around to orbit in 3D about the cursor
TIP When you zoom and orbit using the middle button, the action takes place where ever the cursor is in the drawing. For example, when you roll the scroll wheel to zoom in, you zoom into where the cursor is located. This is great for zooming into a specific place in the drawing: just move the cursor there, and then scroll.
If your mouse has a scroll wheel (most do, these days), then the wheel is the middle button: to drag, hold down the scroll wheel and then move the mouse.
Troubleshooting
If panning and zooming do not work as you expect, then there are two settings to check out.
Enter the MButtonPan variable to ensure it is set to On.
When on, then the middle button pans the drawing.
When off, the middle button carries out the action defined in the Customize dialog box.: mbuttonpan
New current value for MBUTTONPAN (Off or On)<Off>: onIf the middle button is still not panning the drawing, then you may need to change the button's definition in the mouse's utility software. For example, if you use the Logitech®'s SetPoint software to define the middle button as "Double Click" or anything else, then this overrides the definitions assigned by BricsCAD. To fix the no-panning problem, change the mouse driver's definition back to "Middle Button", as illustrated below.

Software for defining Logitech mouse button actions
Me, I used to always define the middle button for double-clicks, which is an especially efficient way of getting around Windows. But this interferes with the CAD program's ability to pan using the middle button. So I now define the double-click action to one of the side-mounted buttons on my nine-button mouse.
OTHER INPUT DEVICES
Many weird and wonderful input devices have been invented during the course of computing history, such as 100-button boxes, voice input and virtual reality goggles. Here I will concentrate on three supported by BricsCAD: digitizing tablets, 3D mice and touch screens.
Digitizing Tablets
Even before mice were invented, digitizing tablets were the most popular way to control CAD software. Other input devices in the 1970s and early 1980s included the light pen and of course the keyboard.

Amiga 1200, graphics tablet Christo / CC BY-SA
Tablets are dual-purpose, allowing users to input commands and draw-edit the model. They ranged in size from a piece of paper, to covering an entire desk.
Pucks had a minimum of four buttons and were available with 12 or 16 buttons. The pucks used for input are precise (unlike today's mice), because they use absolute positioning. (Mice use relative positioning --- it doesn't matter where the mouse is positioned on the desk.) Also available for input was a stylus, like the styluses used today with certain touch screen computers and mobile devices.
Some CAD users still employ the legendary digitizing tablet. It is, however, increasingly difficult to use older models as most computers no longer have the serial port needed to connect the tablet. You can buy serial ports as an add-on to for desktop computers.
Tablet support is included with BricsCAD, as described later.
3D Mice
The 3D mouse is designed to make working with 3D drawings easier. It features a puck that you move up and down in the z-direction, as well as twist and rotate for 3D view rotations.
In practice, you use two mice:
- The regular "2D" mouse for choosing commands and picking objects
- The puck of the 3D mouse for moving the viewpoint
Users typically employ the regular mouse with their dominant hand and the 3D mouse with the other.
The 3D mice range in size from a simple, wireless puck with two buttons, to multi-button behemoths sporting a customizable LCD display. The movement of the puck and the buttons can be customized.

Model adapted from a GrabCAD file by Frits Westers
BricsCAD supports 3D mice from 3Dconnexion, but before it can recognize a 3D mouse, the 3Dconnexion device driver must be installed on your computer. Driver software is included for computers running recent releases of Windows, macOS and Linux. You may need to reboot your computer after installing the 3Dconnexion driver.
There are no controls in BricsCAD for 3D mice (with the exception of the Ctrl3DMouse variable; it enables and disables the 3D mouse). The actions of the 3D mouse's buttons and puck are defined by the 3Dconnexion Properties software, as illustrated below.

Settings for multi-button SpacePilot Pro mouse
Touch Screens
BricsCAD does not officially support touch screens. But they are common with computers running Windows 8.x and 10, and so I thought I should touch on the subject here. Pardon the pun.
The touch actions supported by BricsCAD are just those supported by Windows itself. Below I list the touch actions supported by Microsoft in Windows and the reaction from BricsCAD.
| Touch Action | Effect in Windows | Effect in BricsCAD |
|---|---|---|
| One-finger actions | ||
| Tap | Equivalent to clicking (selecting item) | Picks points while drawing entities; Selects individual entities and grips; Selects UI elements, like ribbon buttons |
| Press and hold | Equivalent to right-clicking | Displays right-click menus; Does not cancel or restart commands |
| Drag vertically | Scrolls page up or down | Moves drawing and dialog box scroll bars |
| Drag horizontally | Selects text | Selects text in the Command line |
| Two-finger actions | ||
| Pinch | Zooms in or out | Zooms in and out |
| Hold and tap* | Equivalent to press-and-hold | Same as press-and-hold |
*Press the element with one finger, then quickly tap with another finger, while continuing to press the item with the first finger. Access shortcut menus like press and hold and right-clicking
While many screens support up to ten fingers touching at the same time, Windows supports just one- or two-finger touches. Individual applications can support more simultaneous touches, if they wish.
Touchpads
Mac computers do not support touch screens. The macOS operating system does, however, support touchpads, whose actions are listed below.

Apple Trackpad. © Raimond Spekking / CC BY-SA 4.0 (via Wikimedia Commons)
| Touch Action | Effect in Windows | Effect in BricsCAD |
|---|---|---|
| One-finger actions | ||
| Tap | Equivalent to clicking (selecting item) | Picks points while drawing entities; Selects individual entities and grips; Selects UI elements, like ribbon buttons |
| Two-finger actions | ||
| Tap | Equivalent to right-clicking | Cancels and restarts commands |
| Three-finger actions | ||
| Drag | Moves elements, like dialog boxes | Zooms in and out |
Note: Four-finger actions are not supported by BricsCAD.
Defining Actions for Mouse Buttons
In summary, you can assign the following types of actions to mouse buttons:
- Single-click actions --- to right and center buttons only
- Shift, Ctrl, and Alt keystrokes --- to assign additional actions to right and center buttons
- Double-click actions --- to the left button only
- Commands, macros, and shortcut menus --- can be assigned as actions to buttons In BricsCAD, the Customize dialog box's Mouse tab consists of three panes:

Customize dialog box showing the Mouse tab
- Click pane (at the left) --- lists the mouse buttons and key combinations that can be assigned actions
- Available Tools pane (at the right) --- lists all of BricsCAD's commands sorted by menu name and shortcut menus. To assign a command or menu to a button, just drag it from this pane into the appropriate button in the Clicks pane
- Button Item pane (at the bottom) --- edits button settings
TUTORIAL: BUTTON ASSIGNMENT
In this tutorial, assign the Move command to the Ctrl+right button by following these steps:
From the Tools menu, select Customize. Notice the Customize dialog.
(Alternatively, enter the Customize command OR enter the cui alias OR else right-click any toolbar and then choose Customize from the shortcut menu.)Choose the Mouse (See figure above).
The mouse button you are defining will be pressed in conjunction with the Ctrl key, and so you need to access the correct part of the plane.
Do it like this:Open the Mouse Buttons node by clicking the + button.
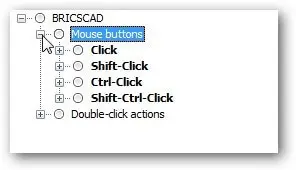
Opening the Mouse Buttons node
Open the Ctrl-Click
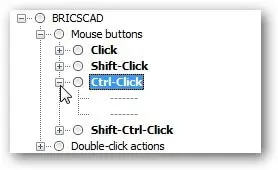
Opening the Ctrl+Click node
Notice that under Ctrl-Click there are two blank entries: each button is labeled with '------'. The first '------' refers to the right button and the second one to the middle button. Click and then look at the bottom pane, where the button name is identified.
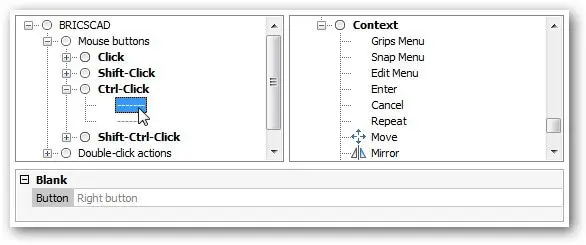
Identifying the right button
In BricsCAD that the default actions are not listed. These default actions are turned on and off with the CtrlMouse variable, as described above under, "Summary of Mouse Variables."
To attach the Move command to this button, drag the Move tool onto the button, like this:
In the Available Tools pane, open the Modify.
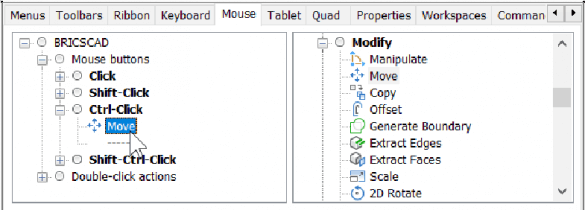
Choosing a command from the list of Available Tools
Choose the Move tool.
Drag it to the correct button position under Ctrl+Click, as shown Notice that the Move command now occupies the first mouse button position under Ctrl-Click (see figure above).
__TIP__ If you drag the tool to the wrong button, then no worries. Just drag it to the correct one.
In the Button Item pane, notice that there are no properties for you to edit. BricsCAD changes the Button property for you when you move the tool to another button.

No properties for new buttons
- With Move assigned to the Ctrl+Click right button, it's time to test it:
- Click OK to save the changes and exit the Customize dialog
- In the BricsCAD drawing window, hold down the Ctrl key and then press the mouse's right button. The Move command should start up.
TUTORIAL: ASSIGNING SHORTCUT MENUS TO BUTTONS
To attach a shortcut menu to a mouse button, follow these steps:
- Follow steps 1-3, listed above.
- In the Available Tools pane, scroll down to the last tool, which is named "Context."
Open the node to see the list of shortcut menus (a.k.a. context menus).
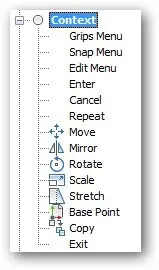
Context (right-click) menus available in BricsCAD
Choose a menu tool and then drag it to the desired button
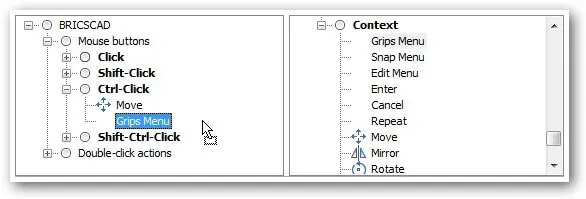
Dragging a context menu to a button, from left to right
Tutorial: Writing Macros for Buttons
In addition to commands and shortcut menus, you can attach macros to buttons in two steps:
Drag any tool onto a button, as described in the tutorial "Defining Actions for " The tool doesn't matter, just make sure it isn't one taken from the Context node.
Edit the tool's Command property:
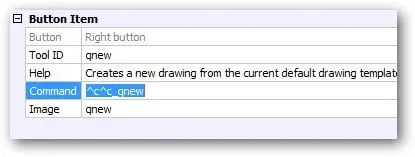
A macro being written in the Command field
See Customizing BricsCAD -- Writing Macros and Diesel Code -- P9 for information on writing macros.
CUSTOMIZING DOUBLE-CLICK ACTIONS
When you double-click an entity, BricsCAD performs an action that is related to the entity. For instance; double-click a hatch pattern and the Edit Hatch dialog box appears. Double-click some text and a text editor appears.
If an action is not defined for an entity, then BricsCAD displays the Properties panel. Not that there is anything wrong with it, the Properties panel, in fact, is sometimes more powerful than the designated editing command.
Here is a list of the default double-click actions that don't launch the Properties panel:
| Entity | Double-click Command |
|---|---|
| Array (associative) | ArrayEdit |
| Attribute definition | DdEdit |
| Attribute in block | EAttEdit |
| Block | BEdit |
| Dimension | DdEdit (edits dimension text) |
| Hatch pattern | HatchEdit dialog box |
| Image | ImageAdjust |
| LwPolyline (modern polyline) | PEdit |
| Multiline leader | DdEdit (edits leader text) |
| Polyline | PEdit |
| Section plane object | ClipDisplay (toggles clipping on and off) |
| Spline | SplinEdit |
| Text (single-line text) | DdEdit |
| Tolerance | DdEdit (to edit the text in the tolerance) |
| Xref (external reference file) | RefEdit |
Changing a Double-click Action
We are going to assign the Join command to the arc entity. Even better, we will turn it into a macro that closes any arc that you double-click. Closing an arc makes it a circle.
To change the action assigned to a double-click, follow these steps.
Open the Customize dialog box with the cui alias, and then click the Mouse
Scroll down until you reach the Double-click
Open the node. Notice the list of entity names.
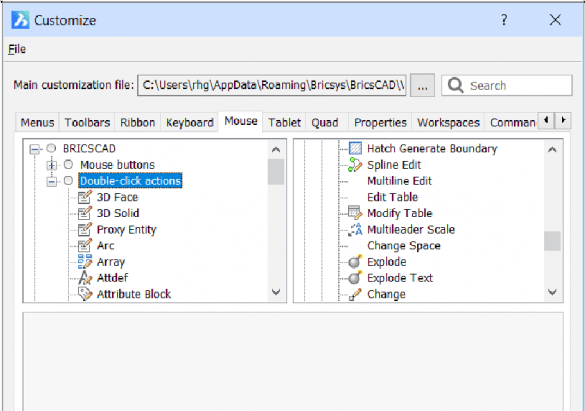
Double-click section of the Customize dialog box
To change the action associated with an entity, select the name of the For this tutorial select Arc.
You cannot just edit the Command property, because then the double-click action will not work, I Instead, follow these steps:
Click the Tool ID Notice the Browse button at the far right end.
Click the Browse Notice the Select Tool dialog box.
Go to the Modify node, and then choose the Join
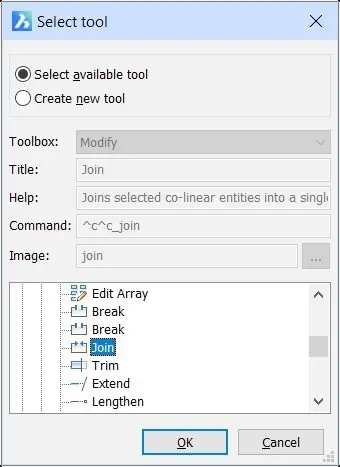
Selecting Join from the list of tools
Click OK.
Back in the Customize dialog box, notice that BricsCAD has filled in all the properties for the Join
Now you can edit the command macro to make it close arcs, like this:Click in the Command field.
Add the text shown in purple:
^C^Carc**;cl;**And you're done

New command assigned
Test the change you made, like this:
- Click the OK button to exit the Customize dialog
- Use the Arc command to draw an
- Double-click the arc: it should close into a circle.
Making a New Double-click Action
Not all entities are listed in the Mouse tab's Double-click section. To see the full list --- and to create a new command that offsets xlines --- follow these steps:
Right-click Double-click action.
Then choose Append double-click action from the shortcut menu.
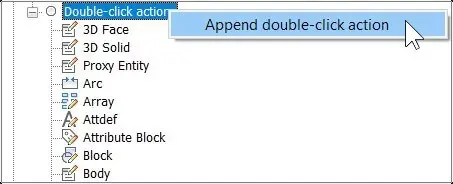
Adding an entity to the list
Notice the Add Double-click Action dialog box.
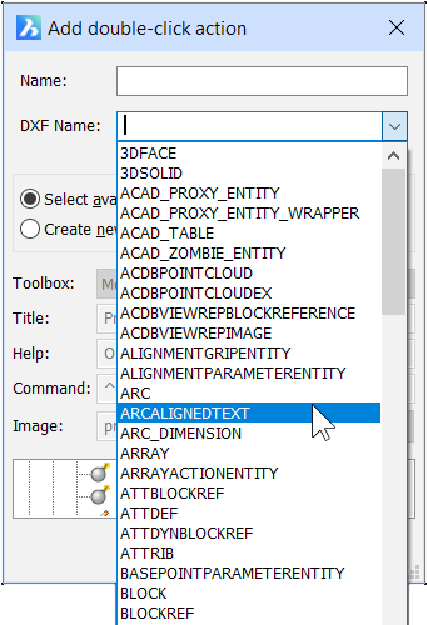
Selecting a DXF name
Click the DXF Name droplist and then choose an entity type. For this tutorial, scroll all the way down to XLine.
With the entity chosen, now it's time to assign a command to the double-click action and so choose the Create New Tool radio button.
From the Toolbox droplist, chose a BricsCAD command to apply. For this tutorial, we'll choose the Offset command.
Now fill out all the fields that are blank in the dialog box --- Name, Title, Help, Command and even Image --- because if you leave one or more blank, then the OK button remains unavailable.
(To add an image, click the Browse button at the far end of the Image field, and then chose an icon from the hundreds provided by BricsCAD.)Click OK to close the dialog Notice that the Double-click Action pane has all of its fields filled in because you filled them out.
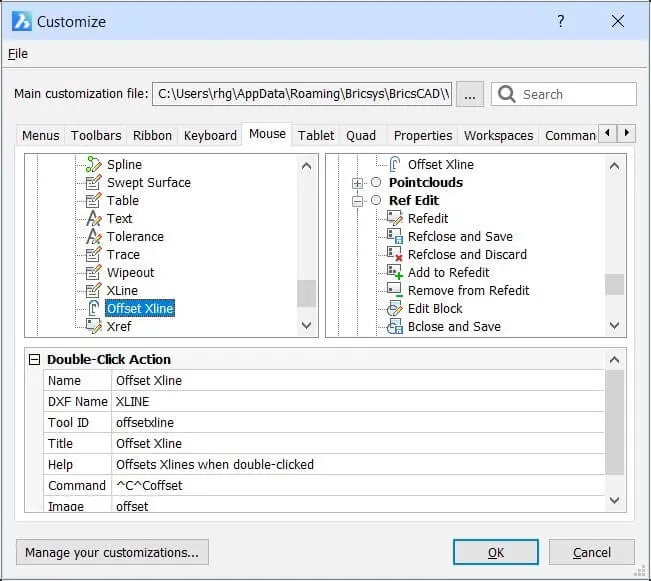
Completed macro
If you wish, edit the Command macro to provide the Offset command with a set offset distance, and so on.
Your final step is to test the change you made, like this:
- Click the OK button to exit the Customize dialog
- Use the XLine command to draw a construction line, and then press Esc to end the command.
- Double-click the xline: the Offset command should launch, prompting you for the offset options.
Defining Actions for Tablet Buttons
Tablet digitizer buttons are customized in the Tablet tab, as illustrated below.

Customize dialog box showing the Tablet tab
Now, normally there are no entries under Digitizer Buttons and Tablet Menus because BricsCAD includes nothing for tablets with the Default profile. If you use a tablet, then you need to download the partial CUI files for tablet buttons and drawings overlays from the Bricsys Web site.
At the time of writing, the Web site no longer appeared to host the file, so you can download it from my cloud account.
After the Tablet.zip file is downloaded, unzip it. Notice that it contains two partial .cui files --- tablet.cui and tablet(acadLike)cui --- along with several support files that not necessary right now.

Listing of files inside the Tablet.zip archive
Back in BricsCAD, open the Customize dialog box and then click File | Load Partial CUI File (or use the MenuLoad command).

Loading a partial .cui file
In the Choose A Customization File dialog box, select tablet.cui and then click Open. Notice that the Customization dialog box now lists two sections for tablet buttons and menus.

Button and menu definitions added to support digitizing tables
TIP Use the Tablet command to configure and calibrate the overlay on the surface of the tablet. This command works only after a tablet is attached to the computer and its drivers have been installed, including WinTab32.dll. See "Digitizing Tablet" in the BricsCAD User Guide portion of the online help system.
To attach commands, macros or shortcut menus to a button, follow the step described in the for mouse buttons --- just do your work in the Click section of Digitizer Buttons, as illustrated below.

Default puck button assignments
The properties for digitizer buttons are pretty similar to that of mouse buttons:

Puck button properties

Tablet overlay drawing. Use overlay(cm) .dwg for metric drawings and overlay(inch).dwg for Imperial drawings.
Download BricsCAD free for 30-days
Start Using BricsCAD Today
Permanent or subscription licenses that work in all languages, in all regions.
- Introduction
- 55 Tips for BricsCAD Users
- Settings
- Changing the Environment
- Custom User Interface
- Introduction to the Customize Dialog Box
- Customize the Menu Bar & Context Menus
- Toolbars and Button Icons
- Writing Macros and Diesel Code
- Ribbon Tabs and Panels
- Keystroke Shortcuts, Aliases & Shell Commands
- Mouse, Double-click & Tablet Buttons
- Absolutely Everything You Need to Know About The Quad
- Rollover Properties
- Workspaces and the User Interface
- Designing Tool & Structure Panels
- Creating Simple & Complex Linetypes
- Patterning Hatches
- Decoding Shapes & Fonts
- Coding with Field Text
- Writing Scripts
- Programming with LISP (Introduction)
- LISP Functions

