In this series you will learn about CAD blocks: what they are, why we use them and how to create, edit, and insert them in BricsCAD®. In the last post we looked at how to manage blocks with the Drawing Explorer. In this post, learn how to create your own blocks.
How To Create a Block in BricsCAD
It's easy to create a block in BricsCAD. If you're familiar with creating AutoCAD® blocks, you'll find the process reassuringly familiar.
To create a block in BricsCAD, you have a few options:
Block -- Groups entities into a block using a dialog box. (-Block prompts you in the command bar.)
Blockify -- Detects and converts repetitive sets of entities to block definitions automatically.
Wblock -- Saves blocks and other drawing entities to .dwg/.dxf files, through a dialog box.
Pasteblock -- Pastes entities from the Clipboard, as a block, in the current drawing.
SectionPlaneToBlock -- Saves section planes as blocks inserted in the current drawing or to the disk as .dwg files.
FlatShot -- Creates a flattened, hidden line representation of 3D solids, 3D surfaces and polyface meshes as a block or a new drawing.
Drag and Drop -- If the DRAGOPEN system variable is set to zero (off). BricsCAD automatically inserts drawings, dragged from Windows Explorer into the current drawing, as a block.
How To Create a Block in Brics CAD
The simplest way to create a block is to use the Block command.

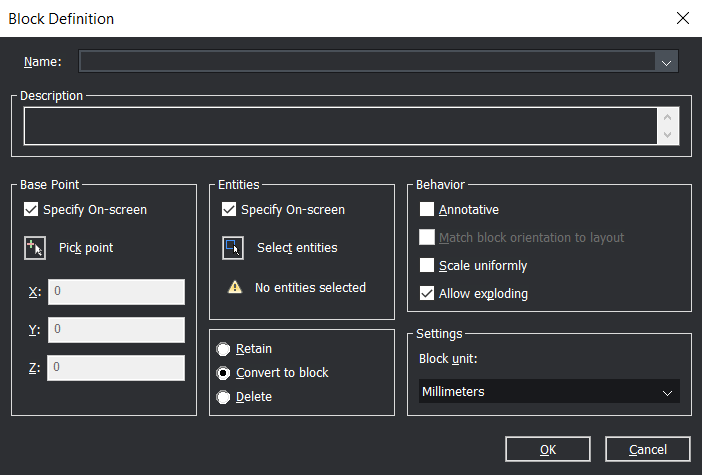
- Use the Block command. The Block Definition dialog will display:

- Type a name for the new block in the Name field.
- To specify the Base Point: do one of the following:
- Check the Specify On-screen option.
You will be prompted to specify the base point after clicking the OK button. - Click the Pick point button.
The Block Definition dialog closes temporarily to let you pick a point in the drawing. - Type the coordinates of the base point in the X-, Y- and Z-field.
- Check the Specify On-screen option.
- To select the entities to be included in the block definition, do one of the following:
- Check the Specify On-screen option.
You will be prompted to select the entities after clicking the OK button. - Click the Select entities button
 .
.
The Block Definition dialog closes temporarily to let you select the entities in the drawing.
- Check the Specify On-screen option.
- Set the block properties:
- Annotative: creates an annotative block.
- Match block orientation to layout: if checked, the orientation of an annotative block is preserved in a rotated viewport.
- Scale uniformly: if checked, the X-, Y- and Z-scaling cannot be set differently.
- Allow exploding: if not checked, prevents the block from being exploded.
- Block unit: set the insertion unit for the block.
- Set the behavior of the selected entities after the block is created:
- Retain: The selected entities remain in the drawing.
- Convert to block: The selected entities are replaced by the newly created block.
- Delete: The selected entities are deleted.
- Click the OK button to create the block.
Note: If the Delete option in step 6 was set, the OOPS command brings back the erased block entities.
Advanced Block Creation
Sometimes you need to clean up a drawing, maybe all the blocks have been exploded or maybe the original illustrator didn't know what a block was. Regardless of the reason, you can use Blockify to automatically convert repetitive sets of entities to block definitions.

Blockify searches the drawing for identical sets of entities and automatically replaces them with block references. It can be used on both 2D entities and 3D solids and you can use Blockify from a selected input or allow it to automatically detect groups of entities.
But that's not all! Blockify automatically adds to and improves the structure of a model. If the model already contains block definitions, the existing block definitions are checked for a match.
How To Save a Block To a Separate File
The WBlock command allows you to write out a block definition as an external drawing file. It works in a similar way to the Block command but also offers you the opportunity to; select from blocks already in the current drawing, to select the entire drawing or to select specific entities from the current drawing. It also gives you the option to choose where the new block file will be saved.

The Write Block to File dialog box.
Note: The Block Definition dialog box in BricsCAD doesn't have options for Hyperlink, Quick select or Block Editor. You can, however, attach hyperlinks, select objects and edit blocks using alternative methods.
What's next?
Come back next time when we'll talk about ways to edit blocks in BricsCAD.
Try Creating Blocks in BricsCAD for Yourself
Permanent or subscription licenses that work in all languages, in all regions.
Download BricsCAD free for 30-days
Read more about Blocks in BricsCAD:
- What is a CAD Block?
- How to Insert a Block
- Working with XRefs
- Manage Blocks With the Drawing Explorer
- How To Create Your Own Blocks
- How to Edit a Block


 .
.