The BricsCAD Settings dialog box is the control center. This is where you make adjustments to the settings of over 1.000 variables. BricsCAD uses variables (settings) to control, change and remember the states of drawings, dimensions, the user interface and the program itself.
For instance, through this dialog box you change the background color of the drawing area or specify the name and path for the default template file. When you want to change the default radius of fillets, you select the Settings option of the Fillet command: this action opens the Settings dialog box at the Chamfer/Fillet section: you are changing the value of variable FilletRad.
Topics covered in this post:
- Touring the BricsCAD Settings dialog box
- Understanding system variables and preferences
- For the complete list of variables and preferences, see Appendix A
- Additional system variables and preferences
Many BricsCAD variables have names that are the same as in AutoCAD® and IntelliCAD, such as FilletRad. But BricsCAD also has its own set of unique variables that it names "preferences," such as BkgColor to set the background color of the drawing area. BricsCAD-only variable names are tagged "BricsCAD only" in the Settings dialog box.
Certain commands take you directly to the related section of the Settings dialog box, such as the DdPMode for setting the display style of points. Other commands have a Settings or Options option that does the same thing, such as the Fillet command's Settings option that I mentioned earlier.
A handy way to get to some settings is by right-clicking a button on the status bar and then choosing Settings from the shortcut menu. For example, you can change the settings of grid, snap and the Quad in this way.
Touring the BricsCAD Settings Dialog Box
To access the dialog box, enter the Settings command. When the dialog box appears, notice that it sorts variables into groups:
- Drawing settings affecting how drawings are created
- Dimensions settings affecting the styles of dimensions
- Program Options settings affecting how the program looks and operates
Plus, there additional settings for the optional add-ons:
- Compare setting for 3D model comparison, part of the Mechanical add-on
- Sheet Metal settings for sheet metal design, part of the Mechanical add-on
- Communicator settings for file translation, part of the Communicator add-on
- Standard Parts settings for sheet metal design, part of the Mechanical add-on
- BIM settings for building information modeling, part of the BIM add-on

Settings dialog box.
First, we examine the functions of the Settings dialog box's toolbar and then we tackle the body of the dialog box.
SETTINGS DIALOG BOX: TOOLBAR
The toolbar is at the top of the Settings dialog box. It changes the way the Settings dialog box presents information and accesses utility commands.

Toolbar in the Settings dialog box
Let's take a look at the functions of the toolbar buttons, beginning at the left end.
Categorized/Alphabetic Sorting
You can search for settings by browsing through categories, or you can look through them alphabetically, or you can use the search field. I tend to use the search field, which I describe later.
The first two buttons on the toolbar switch the dialog box's listing of variables between Categorized and Alphabetic modes:
- Categorized mode is illustrated on the facing page and lists variables in related groups
- Alphabetic mode is shown below and lists them alphabetically by description (rather than by name)
Because BricsCAD lists variables alphabetically by their description (instead of by their actual names), "2D closed B-spline curve import mode" is the first one on the list, even though its variable name is DgnImp2dCloseBSpline.

The Settings dialog box displaying settings in alphabetical order
Show Differences
The Show Differences button clears the dialog box of all settings, except for those whose values have changed from the initial (default) values. Make a change to a variable and it will show up here. This is handy for figuring out what might have changed.

The Settings dialog box showing differences from initial values
We generally don't know what the default value of a variable is and so BricsCAD helps us out here. To change a value back to the default, right-click its name and then choose Restore Default Value from the shortcut menu.

Changing a variable back to its default value.
Notice that the variables with changes are shown in blue. The same happens in the regular dialog box. You can change this color and the kinds of variables listed, as described next.
Dialog Configuration
The Dialog Configurations button lets you search for variables, configure what is searched and how the differences are shown. When you click the button, then BricsCAD displays this dialog box:

Changing a variable back to its default value.
Search. The Search options are useful in limiting where BricsCAD performs its searches. I tend to leave In Variable Names and In Variables Titles turned on, with the others turned off.
While you can use the Find What field that's right here in this sub-dialog box, it doesn't display color change or do real-time searches and so I don't find it useful. Use the toolbar's Search field instead, as described next.
Modified Settings. The Modified Settings section lets you change the color of the changed variables, as well as to determine which variables are displayed by the Show Differences dialog box.
- Display All lists all variables whose values have changed
- Display Settings Stored in Drawing lists only those variables that affect the current drawing
- Display Settings Not Stored in Drawing lists those that affect all drawings
Finding Variables
 The best item in the toolbar is the real-time search field. It lets you directly access variables when you know the first few letters of their names or descriptions. I find this the easiest way to navigate the 900+ entries in the dialog box.
As you type into the search field, BricsCAD immediately jumps to the first item that matches the letters. For instance, when entering "lastpoint," the following occurs:
- Type l focus jumps to Insertion Unit because the description contains the letter 'l'
- Type la focus jumps to Unit Mode, because 'la' is in "displayed" in the description
- Type las focus jumps to Text Angle, because of 'las' in "last" of the description
- Type lastp focus stays in Last Point, because of 'lastp' in "lastpoint" variable name
If the LastPoint variable is not the one that I want, then I click the down arrow to move to the next instance of a candidate that matches "lastp." Continuing with this example, when I click the focus jumps to LastPrompt.
Sometimes the color of the search field changes. The colors report the status of the search term that you entered:
Snow two or more words match the search phrase
Lime only one word matches the search phrase, or a repeated search has returned to the start
Tangerine no words match the search phrase
Export Settings
The last button is Export and is saves all BricsCAD settings and values to a CSV file, short for "commaseparated values." The file contains the names of variables in true alphabetical order, their current values and other information.
Each value is separated by a comma, as shown by this sample:
AUTOSNAP,reg,int,RTSHORT,63,63,,AutoSnap
AttractionDistance,prf,int,RTNONE,3,3,,Grips attraction distance
AutoTrackingVecColor,prf,int,RTNONE,171,171,,Auto tracking vector color
AutosaveChecksOnlyFirstBitDBMOD,prf,bool,RTNONE,1,1,,Ignore all but first bit of DBMOD for autosave
BACKZ,drw,real,RTREAL,0,0,,Back clipping plane offset
TIP Fields are separated by commas. Because coordinates normally use commas --- such as 2,3,4 --- in this CSV file the commas are replaced by semi-colons, such as 2;3;4.
The meaning of each field is explained by the table below using the example of AutoSnap.
AUTOSNAP,reg,int,RTSHORT,63,63,,AutoSnap
| Data | Example | Field Options | Meaning |
|---|---|---|---|
| Name | AUTOSNAP | Variable name | |
| UPPERCASE | System variable | ||
| MixedCase | Unique to BricsCAD | ||
| Save mode | reg | Location where the value is saved | |
| not | Not saved | ||
| prf | In BricsCAD preferences | ||
| reg | In the Windows registry | ||
| drw | In the drawing | ||
| Save type | Type of value | ||
| 0 | bool | Boolean (a toggle, such as 0 or 1) | |
| 4 | int | Integer (no decimal places) | |
| 10000000 | long | Long integer (greater than 216) | |
| 0 .5;0 .5 | pt2d | 2D point (x,y) | |
| 1;0;0 | pt3d | 3D point (x,y,z) | |
| 25 .4 | real | Real number (with decimal places) | |
| ANSI31 | str | Strings (text) | |
| Restype | Numerical type of value | ||
| 4 | RTSHORT | Short integer (same as integer) | |
| 10000000 | RTLONG | Long integer | |
| 0 .5;0 .5 | RTPOINT | 2D and 3D point | |
| 25 .4 | RTREAL | Real number | |
| ANSI31 | RTSTR | String | |
| RTNONE | Stored in preferences | ||
| Default value | 63 | Specifies the default value, as found in the default template file | |
| Current value | 63 | Specifies the current value | |
| Status | Reports when the value is read-only (cannot be changed by the user) | ||
| Title | AutoSnap | Briefly describes the purpose of the variable |
As a file format, CSV is "universal," because it can be imported easily into spreadsheets and databases. These programs use the comma to identify where to separate the fields into columns. In a word processor, I use the Find and Replace command to change commas to tabs.
Exporting Variables
To export the settings data, follow these steps:
Click the Export button. Notice the Export Settings dialog box.
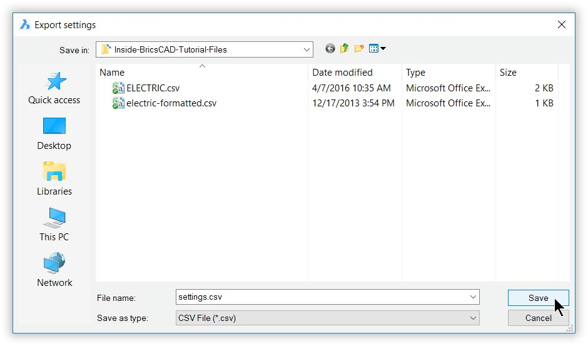
Saving variables to a .csv file.
Choose a folder in which to store the file. You can change the file's name, but make sure you leave the extension set to ".csv".
Click Save.
The data is exported from BricsCAD in alphabetical order, whether or not the current setting is Alphabetical or Categorized. To open the exported file in an application, such as the Calc spreadsheet program from LibreOffice, continue with these steps:
Start LibreOffice. (You can download this LibreOffice free of charge. It is available for Windows, Linux and macOS --- just like BricsCAD!)
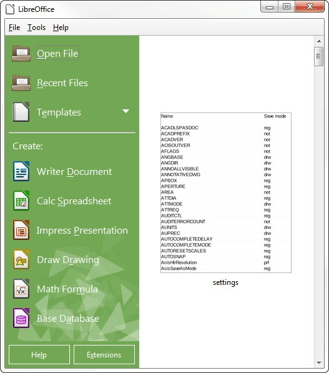
The initial LibreOffice interface.
From the File Manager (Finder on the Mac), drag the settings.csv file into the LibreOffice window shown above.
Notice the Text Import dialog box. It shows you how LibreOffice proposes to separate the comma-delimited data into columns. Under Separator Options, ensure that Comma is selected and then click OK.
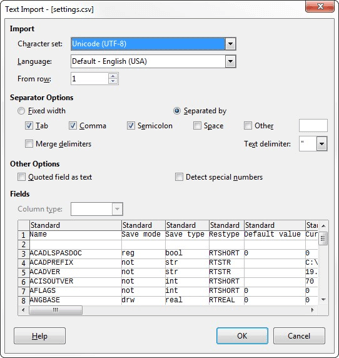
Formatting imported text
Notice that the settings data appears in columns in the spreadsheet. Format and edit the text as you wish.
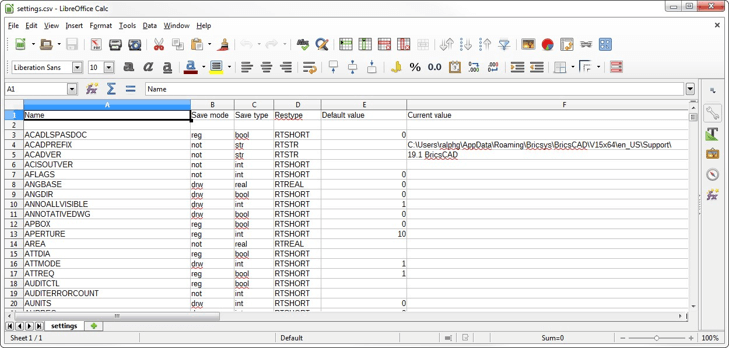
Settings imported successfully into a spreadsheet.
ACCESSING VARIABLES AND CHANGING VALUES
To access the value of a variable, you can use the Find field described above, or else click the node boxes to open sections. (Click nodes to collapse sections.) Notice the nodes:
To change the value of variables, follow these steps:
- Navigate to the variable you want to change.
- Click on the name of the variable.
- Depending on the nature of the variable, you take one of these actions to change the value:
- Text/numerical variable --- type in a new piece of text or a new number

- Toggle variable --- click a checkbox to turn it on (green checkmark) or off (none)

- Option variable --- select an option from a droplist

- Value variable --- enter a new value

- File variable -- Browse button to open the file dialog box

After it is changed, the variable name and its value turns to boldface --- a way of alerting you to changes. Not all variables can be changed.
Those with the "read-only" setting cannot be changed and so are shown with gray text. (See figure below.) When you click on them, they do not react.
Variables Specific to Windows
Some preferences are specific to the Windows version of BricsCAD, such as those related to OLE. They have no effect in Linux or Mac.OS
Changing Variables at the Command Prompt
Outside of the BricsCAD Settings dialog box, you can change the values of variables at the ' : ' command prompt. There are two ways to do this.
- Enter the variable name at the command prompt just like a command name:
: gripblock
New current value for GRIPBLOCK (Off or On)<Off>: on
The values in the parentheses report the valid range of values, such as (Off or On); the value inside the angle brackets report the current (default) value, such as<Off>. I find this useful for determining the range of allowable values. - Use the SetVar command. The only advantage to this command is that it also lets you list the names of variables, if you are unsure of the exact spelling. Here's how to do this:
- First, enter a ? (question mark) at the prompt:
: setvar
Variable name or ?<GRIPBLOCK>: ? - Then, type the part of the name that you know and use an
*(asterisk) to represent the unknown part of the name.
Variable(s) to list <*>: grip*
| GRIPBLOCK | 0 |
|---|---|
| GRIPCOLOR | 72 |
| GRIPDYNCOLOR | 140 |
| GRIPHOT | 240 |
| GRIPHOVER | 150 |
| GRIPOBJLIMIT | 100 |
| GRIPS | 1 |
TIP To get a list of variable names and their current values, press Enter at the 'Variable(s) to list <*>:' prompt.
To capture the list to a file, use the LogFileOn command before entering SetVar and then LogFileOff afterward. The location of the log file is given by variable LogFilePath.
(Historical note: The BricsCAD Settings dialog box was added with BricsCAD V8, replacing the Options dialog box of earlier releases.)
Download BricsCAD free for 30-days
Start Using BricsCAD Today
Permanent or subscription licenses that work in all languages, in all regions.
- Introduction
- 55 Tips for BricsCAD Users
- Settings
- Changing the Environment
- Custom User Interface
- Introduction to the Customize Dialog Box
- Customize the Menu Bar & Context Menus
- Toolbars and Button Icons
- Writing Macros and Diesel Code
- Ribbon Tabs and Panels
- Keystroke Shortcuts, Aliases & Shell Commands
- Mouse, Double-click & Tablet Buttons
- Absolutely Everything You Need to Know About The Quad
- Rollover Properties
- Workspaces and the User Interface
- Designing Tool & Structure Panels
- Creating Simple & Complex Linetypes
- Patterning Hatches
- Decoding Shapes & Fonts
- Coding with Field Text
- Writing Scripts
- Programming with LISP (Introduction)
- LISP Functions

