If you’re switching to BricsCAD, chances are you’ll probably need to install many user workstations and want to speed the installation process up as much as possible.
The good news is that BricsCAD – as opposed to some other CAD tools you may have worked with – has a compact (515MB) installation footprint that copies across networks quickly. Install with no user intervention, in a matter of just a couple of minutes (depending on network transport speeds and machine resources). This compact and speedy installation process lends itself nicely to being automated via batch commands or even group policy options (GPO) in Microsoft Windows networks.
In this post, I’ll provide some best practices for CAD and IT administrators who want to install multiple user seats of BricsCAD in the easiest manner possible.
Quick Overview
Before we get into the specifics of our installation project, you’ll need to do the following homework:
- Check your license file, keys and/or license server are set up and running prior to network installations. This will assure that installations on user machines can proceed without license file hassles. If you haven’t already set up your license files, keys and/or license server please see this resource for help.
Note: Your installation options will vary depending on whether you want to use a floating license manager server or standalone copies. It is important to resolve all issues PRIOR to performing software installation. - Download the BricsCAD MSI installation file.
- Establish a network location for the MSI file and support files to reside. This location should be accessible to all users who will be installing the software. Set to read level permissions for most users, but set as write/edit permissions for you.
- Consider possible installation options. Think about how you’d like the following installation variables to be handled:
- Silent install Do you want to suppress any user intervention in the setup process?
- Desktop icon Do you want the installer to create a default icon or would you prefer to place your own custom icon on the user’s desktop?
- Show release notes Do you want the user to see the product release notes after the installation runs?
- License file Do you want the installer to automatically use the existing license file or license server?
Preparing the BAT File
Now that the homework is done, create the procedure for the installation. In this example I propose the creation of a batch (.BAT) file that can simply be invoked at the user’s remote machine. BAT files are old school, but they are the easiest way to create a complex command string that can be recalled later without any laborious typing.
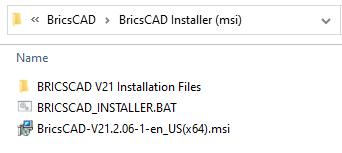
For the purposes of our example here I’ll assume the following path, file names, and configuration:
| Network installation folder: | O:\BricsCAD v21 Installation Files |
| BricsCAD installation BAT file: | BRICSCAD_INSTALLER.BA |
| BricsCAD installation MSI file: | BricsCAD-V21.2.06-1-en_US(x64).msi |
| Silent installation: | Yes |
| Create desktop icon: | Yes |
| Show release notes: | No |
| Use license file: | Yes |
| License file location/name: | O:\BricsCAD License Files\BricsCAD.LIC |
We will now use the MSIEXEC command logic in an installation BAT file using the following syntax:
- Use an editing program to create the batch file and be sure to save it in the folder where the BricsCAD-V21.2.06-1-en_US(x64).msi file resides
BRICSCAD_INSTALLER.BAT
and be sure to save it in theO:\BricsCAD v21 Installation Files
folder where the BricsCAD-V21.2.06-1-en_US(x64).msi file resides
- Add this syntax to the BAT file:
MSIEXEC /I "BricsCAD-V21.2.06-1-en_US(x64).msi" /QN
- Now add an extra parameter to keep the release notes from showing:
MSIEXEC /I "BricsCAD-V21.2.06-1-en_US(x64).msi" /QN SHOWRELEASENOTES=""
- Finally, we add the appropriate parameters for the licensing we wish to use. For all cases add these parameters:
BRICSCAD_INSTALLER.BAT
- For single user or volume license agreements specify a licensing key like this:
BRICSCAD_INSTALLER.BAT
where the actual license key is within “” marks
- For network license installations specify a license like this:
BRXLICENSESERVER="host"
when the license server is on port 5053
- If a license server is installed on anything other than port 5053 then add:
BRXLICENSESERVER="host@port"
where port is the correct port number
The Final Form
Now we can save the BAT file and test it. The line of code in the BAT file can be lengthy and could look like this:MSIEXEC /I "BricsCAD-V21.2.06-1-en_US(x64).msi" /QN SHOWRELEASENOTES="" BRXLICENSEDESTFILE=" O:\BricsCAD License Files" BRXLICENSEFILE=" BricsCAD.LIC " BRXLICENSESERVER="host"
This long line of code can be very hard to manipulate in a text editor so you may wish to format your BAT file using the “^” function to continue input over several lines of input like this:MSIEXEC /I "BricsCAD-V21.2.06-1-en_US(x64).msi" /QN SHOWRELEASENOTES="" ^
BRXLICENSEDESTFILE=" O:\BricsCAD License Files" BRXLICENSEFILE="BricsCAD.LIC" ^
BRXLICENSESERVER="host"
Or even
MSIEXEC /I "BricsCAD-V21.2.06-1-en_US(x64).msi"
/QN SHOWRELEASENOTES="" ^
BRXLICENSEDESTFILE=" O:\BricsCAD License Files" ^
BRXLICENSEFILE="BricsCAD.LIC" ^
BRXLICENSESERVER="host"
Just be sure that a space and the ^ character are at the end of each line you wish to continue to the next line of input.

Testing it Out
Now simply close the BAT file and run it by double-clicking the BAT file. By running the installer you’ll be able to verify proper installation and verification of a license. Should any troubles arise check carefully for typographical errors and incorrect paths and be sure that your network license files, keys and/or network license server components have been correctly installed.

Double-click the BAT file to run it.
Or, alternatively, invoke the BAT file by using other automated scripts or group policy options. This could be run from the network by your IT department.
Next Steps
Now that BricsCAD is installed wouldn’t it be great to get the software configured with all the folders, settings and configuration parameters that are unique to your network environment? That’s the topic we’ll tackle in BricsCAD Network Installation Mechanics – Part 2.
Ready to try BricsCAD?
Easy to try, easy to buy, easy to own. That’s BricsCAD. Try all of our products, for free for 30 days at www.bricsys.com. Freedom of choice, plus perpetual (permanent) product licenses that work with all languages, in all places. You’ll love what we’ve built for you with the BricsCAD V21 product family.
