In this series you will learn about CAD blocks: what they are, why we use them and how to create, edit, and insert them in BricsCAD®. In the last post we looked at how to work with Xrefs. In this post you will learn how to use the Drawing Explorer to manage your blocks and add your block library to BricsCAD for easy access.
The Drawing Explorer
You may remember that Drawing Explorer offers a central location to manage all the style definitions in your drawing. In fact, Drawing Explorer does much more than that. It centralizes all named drawing content (including blocks) in a single dialog box!
Access Drawing Explorer from the General menu on the Quad. It's also accessible via other methods including the EXPLORER command. If you launch the Drawing Explorer with the EXPBLOCKS (XB) command, it automatically displays the panels for Blocks.

The drawing explorer access from the Quad.
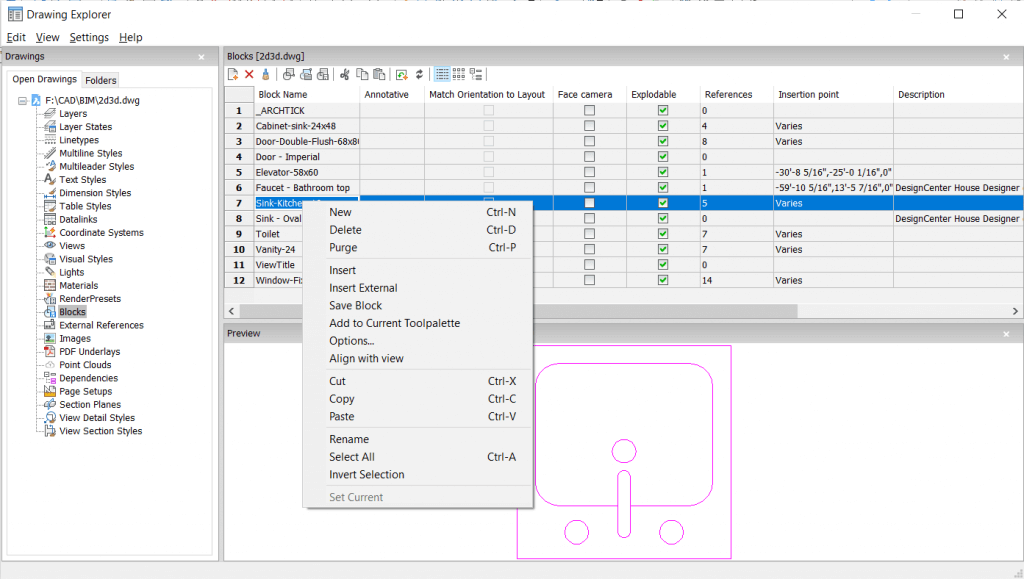
The Drawing Explorer lists all block definitions in the drawing and includes relevant information and controls. You can see how many instances of a block are in the drawing and you can modify basic block properties. For example, you can specify whether a block is Annotative or Explodable.
You can switch between Detail view (list), Icon view (thumbnails) and Tree view. You'll find the option in the toolbar at the top of the Drawing Explorer window.
A preview of the block that is currently selected will display in the bottom of the Drawing Explorer window.
Create a block using the Drawing Explorer
Enter the Drawing Explorer (XB).
In the Drawing Explorer dialog do one of the following:
- Click the New button on the Details toolbar.
- Choose New in the Edit menu.
The Drawing Explorer dialog will close temporarily.
You are prompted: Insertion point for new block:Specify the insertion point of the new block.
You are prompted: Select entities for block.Select the entities for the new block.
Right-click to create the block.
The selected entities are removed from the drawing.
The Drawing Explorer dialog reopens.
The Name field of the new block is selected.Type a name in the Name field, replacing the default NewBlock1 name.
Close the Drawing Explorer dialog.
(optional) Type OOPS in the command bar, then press Enter to bring back the selected block-entities.
Insert a block from the Drawing Explorer

To insert a block from the Drawing Explorer (in Icon view).
- Enter the Drawing Explorer (XB).
- Double click the thumbnail.
The drawing Explorer dialog will close temporarily. - Click on the workspace to insert the bock.
Use the rotate and scale option to change the insertion of the block. By default, angles are measured counterclockwise in BricsCAD. - (Optional) To access more options, right-click the block, from the Drawing Explorer.

Adding a Block Library
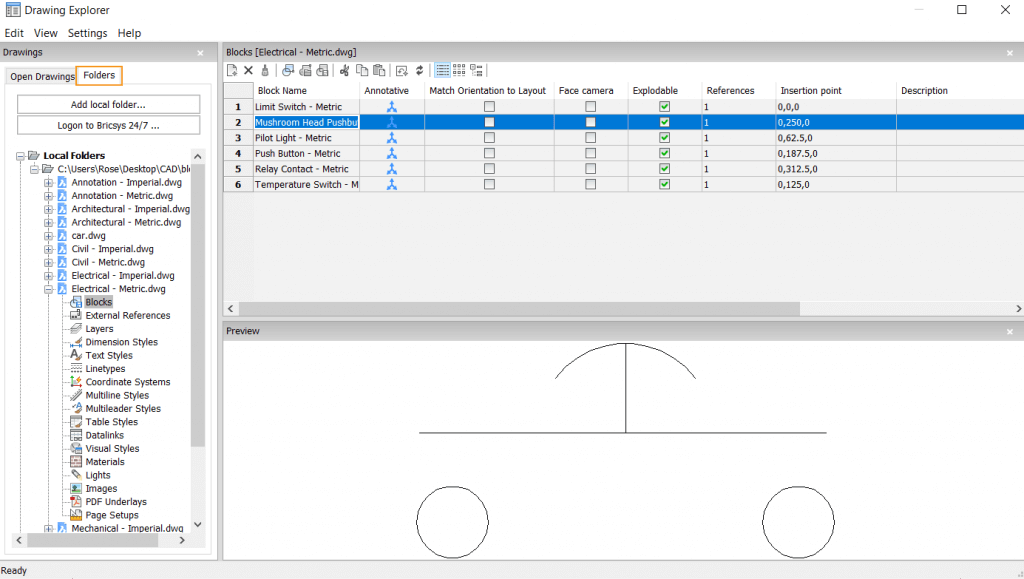
You can also use the Drawing Explorer to add your own block libraries and to insert blocks that exist in another drawing without opening the containing drawing.
- Click the file tab.

- Click "Add local folder".
- Select the folder you want to add.
- Select the drawing file from the tree.
- Click the + button and select "Blocks". The blocks available in that drawing will display.
- To add a block use the steps from [How to insert a block from the Drawing Explorer].
Once you add a folder you can use it for all future drawings, unless you remove it.
You can insert these blocks as you would internally referenced blocks. Once added to the drawing the block will become an internally referenced entity and will be visible on the Open Drawings tab of the Drawing Explorer.
What's next?
In the next post we'll look at how to create your own blocks in BricsCAD.
Read more about Blocks in BricsCAD:
- What is a CAD Block?
- How to Insert a Block
- Working with XRefs
- Manage Blocks With the Drawing Explorer
- How To Create Your Own Blocks
- How to Edit a Block
Explore BricsCAD
Download BricsCAD Free Trial | Sign Up For News & Updates | Shop Online For BricsCAD Desktop Software


