In this post, learn how to customize the BricsCAD® User Interface and workspace to your liking.
BricsCAD is a general CAD engine designed to work with many different disciplines. It can be used for architectural modeling, for mechanical design, for mapping, etc --- all of which employ different sets of commands. When it comes to the user interface itself, you might prefer to work with toolbars or with the Ribbon; you might want the drawing area shown by a gradient of colors or in a solid color.
Workspaces let you customize the user interface to your liking, and you can switch between them quickly. BricsCAD comes with several workspaces already defined for general drafting, 2D, mechanical design, 3D general modeling, and 3D BIM modeling.
The following topics are covered in this post:
- Understanding how workspaces change the user interface
- Customizing workspaces
QUICK SUMMARY OF WORKSPACE COMMANDS & VARIABLE
The names of workspaces changed with BricsCAD V20:
| Old Workspace Name | New Workspace Name | Default Display |
|---|---|---|
| 2D Drafting | Drafting | Ribbon |
| … | Drafting (Toolbars) | Menu bar and toolbars, no Ribbon |
| … | Modeling | Ribbon |
| 3D modeling | Modeling (Toolbars) | Menu bar and toolbars, no Ribbon |
| BIM | BIM | Ribbon |
| Mechanical | Mechanical | Ribbon |
| Sheetmetal | … | (removed from V19) |
The Sheet Metal workspace was removed from V15, returned with V16, and then removed again from V19. BricsCAD V17 disabled the On Switch parameter; is still present but is inoperative. You can switch between workspaces with the status bar and a toolbar:

On the status bar, right-click the name of a workspace, and then choose another one

In the Workspaces toolbar, click the droplist and then choose the name of a workspace
There is no way to change the workspace from the Ribbon or the menu bar. The U (undo) command does not reverse workspace changes.
COMMANDS
The following commands work with workspaces:
Workspace --- saves, renames, deletes, and sets the current named workspace.
WsSave --- saves the current user interface as a named workspace.
WsSettings --- opens the Customize dialog box at the Workspaces tab (and not the Settings dialog box)
VARIABLES
The following variables work with workspaces:
WsCurrent variable --- specifies the name of the current workspace.
WsAutoSave variable --- determines if changes to the user interface are saved to the workspace.
Workspace Customization Elements
Workspaces are created and modified in the Workspaces tab of the Customize dialog box. It lists the user interface elements that can be displayed, and additional options determine if the elements actually are displayed by the workspace. In this post, we learn how this works.

ADDING AND REMOVING WORKSPACES
You can add and remove workspaces by right-clicking a workspace name in the Customize dialog box, and then choosing an option from a shortcut menu.
Removing Workspaces
To remove a workspace, follow these steps:
Right-click the workspace name and then choose Delete.
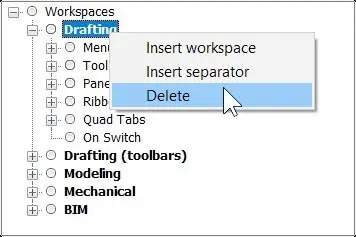
Removing a workspace
BricsCAD displays the "Are You Sure?" dialog box:
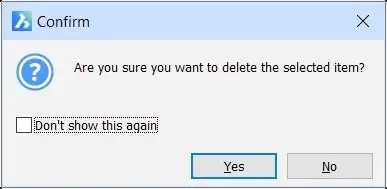
Getting a second chance
Answer Yes or No.
You recover the removed element with the Manage Your Customizations button, as described in Part 10 Customize the Ribbon Tabs and Panels.
Adding Workspaces
To add a workspace, follow these steps:
Right-click the name an existing workspace name, and then choose Insert Workspace.
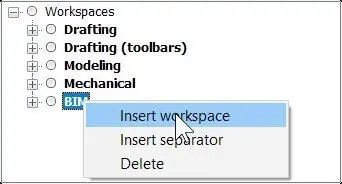
Starting to insert a new workspace
BricsCAD displays the Add Workspace dialog box for you to give it a name. If you click OK without entering a name, the workspace is not created.
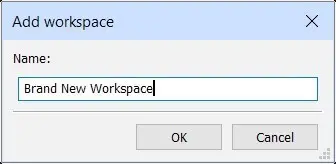
Notice that it is inserted above the workspace that you selected. The new workspace contains the following elements:
- All menus
- The set of toolbars shown below
- The panels shown below, all set to "Don't Change"
- No Ribbon elements
- No Quad items

Default elements of a new workspace
About Insert Separator
The Insert Separator option adds a line as a row of dashes. It is visible only in the Customize dialog box; the line does not appear in the Workspace toolbar or on the status bar.

Separator added to the Workspaces tab
You use the separator as a guide to visually separate groups of workspaces.
TOGGLING THE DISPLAY OF BricsCAD USER INTERFACE ELEMENTS
The Workspaces tab's primary purpose is to toggle the display of user interface elements on and off independently in each workspace. You turn elements on and off by these methods:
Method 1. Include the UI element in the workspace
Method 2. Toggle the Display parameter to On or Off (not all elements offer this parameter) In the following section, we look at both methods.
Workspace Property Toggles
When you choose the name of a workspace in the Customize dialog box, the Workspace pane displays a long list of properties (greatly expanded in V20). You can think of these properties as master toggles.

Default properties of a new workspace displayed by the Customize dialog box
Workspace properties have the following meaning:
Name Name of the workspace displayed in the workspace list in the status bar and by the Workspace toolbar (reported by the WsCurrent variable)
Display Determines if the workspace name is displayed by the status bar and toolbar droplists:
- Yes
- No
Note: When this property is turned off, the name of the workspace is still recognized by the Workspace command.
Description Help-like description displayed in the status bar
ID Identifies the element in the CUI file, which stores all of these customizations; the "ws" prefix marks this element as a workspace
Menu Bar Toggles the display state of the menu bar (also toggled by the MenuBar variable):
- On shows the menu bar when entering this workspace
- Off hides the menu bar when entering this workspace
- Don't Change the display state when entering this workspace
Scrollbars Toggles the display of scroll bars (also toggled by the ScrollBars variable):
- On shows the scroll bar when entering the workspace
- Off hides the scroll bar
- Don't Change the display state when entering this workspace
Default Toggles whether this workspace is the default one when BricsCAD starts:
- Yes shows this workspace when BricsCAD starts
- No does not show this workspace
Stack Type Determines how panels are displayed (reported by read-only StackPanelType variable);
- Fixed resizeable panelset prevents the panel from collapsing (0)
- Collapsable panelset allows the panel to collapse into a set (1)
- Flyout panelset places the panel in a flyout; see figure below (2)

Left: Small panel icons Right: extra-large panel icons
Panel Button Size Specifies the initial size of buttons on panels (reported by read-only PanelButtonSize variable);
- Small displays 16×16 icons (0) (see figure above)
- Large displays 24×24 icons (1)
- Very Large displays 32×32 icons (2)
Tool Button Size Specifies the initial size of buttons on toolbars (reported by read-only ToolButtonSize variable):
- Small displays 16×16 icons (0)
- Large displays 24×24 icons (1)
- Very Large displays 32×32 icons (2)
Toolbar Margin Specifies margin above and below each toolbar; measured in pixels (reported by read-only ToolbarMargin variable)
Tool Padding Specifies margin between icons on each toolbar; measured in pixels; (reported by read-only ToolIconPadding variable)

Toolbar with normal spacing

Toolbar with padding = 5 and margin = 5
TIP Use the Toolbar Margin and Tool Padding values to increase the space around toolbar buttons, which can make them easier to touch with a finger on a touchscreen monitor. For this, you could create a workspace named "Drafting (Touchscreen)."
(new in v20) The following workspace properties are specific to variables used by BricsCAD Mechanical.
Delete Tool Specifies what to do with tool entities following the Subtract command:
- 0 does not delete tool entities
- 1 deletes tool entities
DMAUDIT Level Specifies messages to display:
- 0 reports errors
- 1 ignores dynamic range errors
- 2 ignores sliver faces
- 3 ignores both
Extrude Mode Determines what happens during the Extrude command:
- 0 unites newly created solids with existing ones
- 1 creates new solids when extruding a contour laying on a solid
- 2 subtracts newly created portions from intersected solids
- 4 do not modify intersecting solids
DMPUSHPULL Subtract Specifies whether to enable subtract mode in DmPushPull command:
- 0 does not subtract
- 1 subtracts
Generate Associative Drawings Toggles associativity of generated drawings with the 3D model.
Report Panel Mode Determines the look of the Report panel:
- 0 Classic mode (dockable window)
- 1 Modern mode (transparent panel)
- 2 Hidden mode (hidden in the status bar)
Selection Modes Specifies the subentities to highlight during entity selection:
- 0 selects the entire 3D model
- 1 select edges
- 2 select faces
- 4 detect boundaries
- 8 select vertices
Sheet Set Manager Open Toggles whether the Sheet Set Manager panel is opened automatically when a drawing from a sheet set is opened.
Structure Tree Config Names the .cst structure tree configuration file to use
Components Config Names the .ccf components configuration file to use
Warning Message Level Determine which warning messages to display; see figure below:

Options of the warning messages variable
Show Menus
Several shortcut menus in the Workspaces tab have an option called "Show," such as Show Menu and Show Toolbar.

Shortcut menu in Workspaces tab to access a specific menu or toolbar
These options have nothing to do with the visibility of menus, toolbars, or other UI elements; instead, it switches (in this case) to the Menu tab of the Customization dialog box and to the specific menu ("File," in the figure above), so that you can customize the content of the File menu.
TOGGLING VISIBILITY OF UI ELEMENTS
The whole purpose of workspaces is to determine what UI elements are displayed, and how. When these elements are listed in the Workspaces tab, then they will (probably) appear in the workspace --- unless the Display property is set to "No." But there are some subtleties for each type of element. Let's go through them.
Toggling Menus
The Menus node determines which menu drop-downs are displayed, such as File and Edit. When a menu name appears in this list, it is displayed by the workspace. Toggle the display of the menu bar through the Properties pane of the workspace
To make changes to a menu, use the Show Menu shortcut (as described above) to get to the Menu tab; see Customizing the Menu Bar & Context Menus P7.
Toggling Toolbars
The Toolbars node determines which toolbars are displayed by the workspace. When a toolbar name appears in this list, it is displayed by the workspace. You can change the content of toolbars with the Toolbars tab; see Customize Toolbars and Button Icons P8.
Toggling Panels
The Palettes node determines which panels (a.k.a. palettes or bars) are displayed through the use of a three-way toggle:

Shortcut menu for palette items
Tick means the panel will be displayed when switching to this workspace
Empty box means the panel is not displayed
Square means the panel display state is not changed (i.e., if off when entering the workspace, then it stays off)
Toggling Ribbons
The Ribbon node determines which Ribbon tabs are displayed by the workspace. When the name of a Ribbon's tab appears in this list, then it is displayed by the workspace. You change the content of tabs and panels through the Ribbon tab; see Customizing the Ribbon Tabs and Panels P 10.
Toggle the Quad
The Quad Tabs node determines which quad groups and commands are displayed. When a Quad tab (a.k.a. Quad group) name appears in this list, it is displayed by the workspace, unless the Display property = No. You change the content of Quad groups through the Quad tab; see Absolutely Everything You Need to Know About The Quad P13.
The On Switch node was disabled with BricsCAD V17 and now acts only as a placeholder.

FINE-TUNING UI ELEMENTS
Earlier you saw the properties that are available for workspaces. Some user interface elements have additional properties that you can adjust, specifically menu items, toolbars, palettes, Ribbon tabs, and Quad tabs.
Workspace Properties for Menus
When you choose the name of a menu, such as "File" ...

File menu selected in Workspaces tab
...then BricsCAD plays these properties:

Properties of a dropdown menu
Here is the meaning of the properties:
Menu Group Name of the menu group
ID Identifies the element in the CUIX file; "mn" prefix marks this element as a menu.
Display Determines if the menu is displayed by the menu bar:
- Yes
- No
Title Name of the menu displayed on the menu bar; the & indicates the underlined letter for Alt-key shortcut access. To access menus with a keyboard, hold down the Alt key: notice the underlined characters on the menu bar, and then press the underlined letter to access the menu, such as f for File menu, as illustrated below.
Diesel Executes Diesel code when the user selects the menu.
Properties of Toolbars
When you choose the name of a toolbar, such as "Standard," BricsCAD displays these properties:

Properties of a toolbar
Menu Group Name of the menu group ID Identifies the element in the CUIX file; "tb" prefix marks this element as a toolbar
Display Determines if the toolbar is displayed when the workspace is opened:
- Yes
- No
Position Determines the toolbar's initial location:
- Floating --- toolbar is located using the X and Y properties
- Top --- toolbar is attached to the top of the drawing area
- Left--- toolbar is attached at the left of the drawing area
- Bottom--- toolbar is attached to the bottom of the drawing area
- Right--- toolbar is attached at the right of the drawing area
Row Specifies the number of toolbar rows
Column Specifies the number of toolbar columns
X Locates the top of floating toolbars; the horizontal measurement is in pixels from the top of the computer screen. Floating toolbars can float outside of the BricsCAD window
Y Locates left edge othe f toolbar, measured in pixels from the left edge of the computer's screen
Title Name of the toolbar displayed on the title bar of floating toolbars
Properties of Panels
When you choose the name of a panel such as "Command Line," BricsCAD plays the properties listed below. The same properties are available to every panel.
TIP When panels are CDOCK'ed (center docked), they overlap. Because the topmost panel hides the others, BricsCAD automatically display tabs so that the user can switch between them.
The Stack Z Order parameter determines the order in which the tabs appear.

Properties of a panel, the Materials Browser panel in this case
ID Identifies the name of the element in the CUIX file; cannot be edited by users
Title Name of the panel displayed in the Customize dialog box; a changed title has no effect on the name displayed by the panel's title bar.

Changing the panel Title from “Command Line” to “My Command Input Area”
Display Determines if the panel is displayed by the workspace:
- Show --- shows the panel when users switches to a workspace
- Hide --- does not show the panel when users switches to a workspace
- Don't Change --- show if visible in a previous workspace; keep hidden, if not
State Determines the default location of the panel when a user switches to this workspace:
- Floating --- floats anywhere at coordinates defined by Float parameters
- Dock Top --- docks the o top of drawing area as defined by Dock parameters
- Dock Left --- docks the o left of the drawing area
- Dock Bottom --- docks to bottom of the drawing area
- Dock Right --- docks to right of the drawing area
- Don't Change --- show if visible in the previous workspace; keep hidden, if not
Stack ID Locates the panel when stacked:
- LDOCK --- docked to the left of the stack
- RDOCK --- docked to the right of the stack
- TDOCK --- docked at the top of the stack
- BDOCK --- docked at the bottom of the stack
- CDOCK --- docked on the center of the stack, overlapping other panels
Stack Z Order Determines which panel is on top of other panels when center stacked (CDOCK):
- 0 --- Highest priority (panel appears on top of other, higher-numbered panels)
Dock Column Position of the panel (relative to other panels) when docked to the left or right
Dock Row Position of the panel (relative to other panels) when docked to the top or bottom
Dock Width Width of the panel when docked at left or right; measured in pixels.
Dock Height Height of the panel when docked at top or bottom; measured in pixels
Float Left Left edge's starting location of a floating panel; 0 = left edge of the main monitor
Float Top Top edge's starting location of a floating panel; 0 = top edge of the main monitor
Float Width Width of the panel when floating; measured in pixels
Float Height Height of the floating panel; measured in pixels
Transparency Determines the level of translucency of the panel:
- 0 Fully opaque (default)
- 90 Maximum translucency (nearly transparent)
TIPS When you assign the same Stack Z Order number to two or more panels, BricsCAD changes one of the duplicated numbers automatically. For instance, assign Stack Z Order = 2 to Layers and Rendering, and one of them will be changed to 3.The Float Left and Top parameters apply to the position of the panels when using a multi-monitor setup
When you move a panel to the left edge of the drawing area, BricsCAD previews the five possible dock locations, as illustrated below: left, right, top, bottom, or center.

Panel preview
Properties of Ribbon Tabs
When you choose the name of a Ribbon tab, such as "Home, " BricsCAD displays these properties for the tab:

Properties of a Ribbon tab
Menu Group Name of the menu group.
ID Identifies element in the CUIX file; "rt" prefix marks this element as a Ribbon tab
Label Identifies the element in the Customize dialog box
Title Names the tab as displayed on the Ribbon
Key Tip Specifies letter to use for Alt-key shortcut access; not implemented.
TIP If key tips were implemented, it would work like this: hold down the Alt key; notice the characters in the tooltips, then press the letter on the keyboard to access the tab, such as h for Home tab.
Quad Reactors were removed from BricsCAD V18, as were the properties of Quad Tabs (Groups) from the Customize dialog box.
TIP When items are shown in gray and are turned off, such as BIM Libraries in the figure below, it means that an extra license needs to be purchased or that the panel has not yet been implemented, such as Visual Styles.
Properties of Quad Items
The only aspect of Quad items that can be customized is whether they appear in the current workspace. When you choose the name of a Quad item (under a Quad Tab name), BricsCAD displays these properties:

Properties of a Quad item
Title Name of the group displayed by the Quad; read-only
Label Name of the Quad tab; read-only
Title Named displayed by the Quad tab; read-only
Display Determines if the tab is displayed by the quad in this workspace:
- Yes
- No
The job of creating Quad groups was moved from this tab to the new Quad tab in BricsCAD V18; see Absolutely Everything You Need to Know About The Quad P13.
Download BricsCAD free for 30-days
Start Using BricsCAD Today
Permanent or subscription licenses that work in all languages, in all regions.
- Introduction
- 55 Tips for BricsCAD Users
- Settings
- Changing the Environment
- Custom User Interface
- Introduction to the Customize Dialog Box
- Customize the Menu Bar & Context Menus
- Toolbars and Button Icons
- Writing Macros and Diesel Code
- Ribbon Tabs and Panels
- Keystroke Shortcuts, Aliases & Shell Commands
- Mouse, Double-click & Tablet Buttons
- Absolutely Everything You Need to Know About The Quad
- Rollover Properties
- Workspaces and the User Interface
- Designing Tool & Structure Panels
- Creating Simple & Complex Linetypes
- Patterning Hatches
- Decoding Shapes & Fonts
- Coding with Field Text
- Writing Scripts
- Programming with LISP (Introduction)
- LISP Functions

