In this series you will learn about CAD blocks: what they are, why we use them and how to create, edit, and insert a block in BricsCAD®. In the last post you learn what a CAD block is. In this post, learn how to insert blocks into a BricsCAD drawing.
How do I insert a block in BricsCAD?
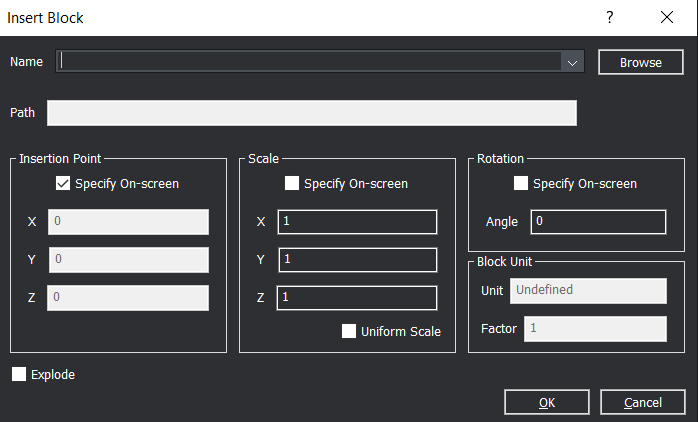
The Insert command lets you insert blocks through a dialog box. You can use this command to insert an existing block already in the drawing database or insert any .dwg file as a new block.
When you insert a drawing, a new block definition is created in the current drawing. Blocks in the current drawing will remain the same, any changes to the external file will not be visible in the current drawing unless you redefine the block by reinserting it. When a block is inserted in a drawing, it is treated as a single entity.
To insert a block in BricsCAD:
- Launch the Insert command.
- The Insert Block dialog opens.

- In the Insert Block dialog, do one of the following:
- Select an existing block definition from the Name list.
- Click the Browse button and select a drawing file.
- (option) Check the Explode option to explode the block after insertion.
- (option) Uncheck the Specify On-Screen option, then specify the Insertion Point by keying in the coordinates in the X , Y and Z fields.
- (option) Uncheck the Specify On-Screen option, then specify the Scale by keying in the scaling factors in the X , Y and Z fields.
Check the Uniform Scale option to keep the X , Y and Z scale factors equal. - (option) Check the Specify On-Screen option to specify the Rotation angle during block insertion.
- Click the OK button.
You are prompted: Insertion point for block.
A prompt menu displays.
- Specify the insertion point.
You are prompted: Corner/XYZ/X scale factor <1.000000>:
A prompt menu displays.
- Right-click or hit Enter to accept the default X scale factor .
You are prompted: Y scale factor: <Equal to X scale (1.000000)>: - Right-click or hit Enter to set the Y scale factor equal to the X scale factor .
The block is inserted.
Good to Know
- If you type the name of block, BricsCAD will lookup the block in the current drawing block definitions. If the block is not found in the current drawing, the paths defined by the SRCHPATH system variable are searched. If the block is not found there either, BricsCAD responds 'Could not find file
<blockname>' - The base point of a block is defined by the INSBASE system variable. The INSBASE system variable is set by the BASE command.
- If a block contains attributes you will be prompted to fill out the text for each attribute in the Command line.
- BricsCAD uses the INSUNITS system variable to set scaling when inserting blocks or attaching Xrefs. To prevent automatic scaling triggered by INSUNITS, you can use the INSUNITSSCALING setting
- The IMPORT command adds the content of other files into the current file, as loose entities, not as blocks.
Drag and drop a block
To automatically insert drawings, dragged from the Windows Explorer into the current drawing, as a block, set the DRAGOPEN system variable to zero (OFF). If the DRAGOPEN system variable is set to 1 (ON), the drawing will be opened instead.
For more options on drag and drop use the right mouse button. This will display a dialog box and give you the options to insert the block as an Xref, Overlay, to open simply the drawing and more.
How To Insert a Block Aligned with an Entity
Use the __Insertaligned __ command to insert a block that automatically aligns with existing entities in a drawing.

Insertaligned works just like the Insert command but during placement, the block dynamically aligns with existing lines, polylines, arcs or circles. If no entity is snapped, the block is aligned with the X-axis of the WCS.
Insert Multiple Instances of a Block as a Rectangular Array
Use the Minsert command to insert a block as a rectangular array (short for "multiple insertions"). If you are familiar with Array, you should have no problems using this command!

How to Insert Multiple Instances of a Block as a Rectangular Array:
- Launch the minsert command.
You are prompted: ? to list blocks in drawing/~ to open the file dialog/<Block to insert>: - Do one of the following:
- Type ~ (hit and hold the alt gr key, then hit the ~ key), then hit Enter.
The Insert Block file dialog displays.
Select the drawing file you want to insert and click the Open button (or double click the file name). - Hit Enter to accept the
<Block to insert>. - Type a block name, then hit Enter.
- (Optional) type ? to search for existing block definitions.
- Type ~ (hit and hold the alt gr key, then hit the ~ key), then hit Enter.
- The block is now attached to the cursor.
You are prompted:Multiple blocks/<Insertion point for block>: - Specify the insertion point.
You are prompted: Corner/XYZ/X scale factor <1.00>: - To define the X scale factor, do one of the following:
- Hit Enter to accept the default .
- Type the X scale factor, then hit Enter.
- Click to define the X scale factor graphically.
- You are prompted: Y scale factor: <Equal to X scale (current X scale)>:
- Repeat step 5 to define the Y scale factor.
- You are prompted: Rotation angle for block <0>:
Do one of the following:- Hit Enter to set the rotation angle to 0°.
- Type a rotation angle, then hit Enter.
- Click to define the rotation angle graphically.
You are prompted: Number of rows in the array <1>: - Type the number of rows, then hit Enter or hit Enter for one row.
You are prompted: Number of columns <1>: - Type the number of columns, then hit Enter or hit Enter for one column.
You are prompted: Vertical distance between rows, or spacing rectangle: - Type the row spacing distance, then hit Enter.
You are prompted: Horizontal distance between columns: - Type the column spacing distance, then hit Enter.
The block array is created as a single entity.
Good to know
- If you choose Multiple blocks (step 3) you are prompted to create multiple instances of the block array.
- It is not possible to explode a MInsert Block entity.
- If you type the name of the block (step 2) BricsCAD will lookup the block in the current drawing block definitions.
- If the block is not found in the current drawing, the paths defined by the SRCHPATH system variable are searched. If the block is not found there either, BricsCAD responds 'Could not find file
<blockname>'
How to Import a PDF as a Block in BricsCAD
In the PDF Import Settings section of the Settings dialog box, Tick the "Import a PDF as a block" option to import a PDF as a block. Then import a PDF as a block, with the PdfImport command.

How to Insert a Block into BricsCAD Using the Drawing Explorer
You can also insert block using the Drawing Explorer. Learn more about how to use the Drawing Explorer in BricsCAD.
How to insert an Xref
You can also insert a block into BricsCAD as an external reference (an XRef). We'll cover this topic in detail in the next post!
Try Inserting Blocks in BricsCAD for Yourself
Permanent or subscription licenses that work in all languages, in all regions.
Download BricsCAD free for 30-days


